1) Auto pick passive components
The simplest way to add components is to let atopile pick them for you. This works for passive components such as resistors, capacitors, and inductors. For example, let’s say you need a 10kΩ resistor with 1% tolerance in an 0402 package:2) Add specific component
The embeddedato create part CLI tool fetches a part and adds the pinout, footprint, and 3D model to your project.
- A JLCPCB part number (for example
C7426) - An exact manufacturer part number (for example
NE5532DR)
C7426 and press enter.
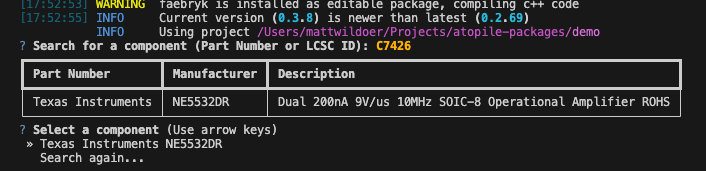
Enter through the default options.
The new component
component keyword tells the compiler that a new component class is being specified, which is a subclass of module.
The has_part_picked trait tells the compiler it can pick that JLCPCB part to fill this spot.
The manufacturer and mpn attributes together fully specify which component this is as well.
If you’re making a component class for a specific component, it’s typically a good idea to include at least either the lcsc_id or the mpn + manufacturer.
The is_atomic_part trait tells the compiler that this component represents a physical part that can be placed on a PCB. The trait takes several important attributes including the manufacturer and partnumber (MPN) of the part, along with the KiCad footprint and symbol files and 3D model (STEP) file to use for rendering the part.
The datasheet_url and designator_prefix attributes are optional, but it’s a good idea to include them. They’re self-explanatory.
pin
Use the pin keyword to define electrical interfaces, which the compiler maps to pads on the footprint.
That is, pin 2 says:
- Create a signal named
2(the compiler treats pins as a special-case where they may have an integer name) - Connect the signal to pad “2” on the footprint
3) Use a package from the registry
The atopile package registry contains many pre-made packages for common components. For example, if you need an RP2040 microcontroller, you can install the package:4) Create custom part
For parts not available throughato create part, you can manually add components to your parts directory.
- Create a new folder to your parts directory
project/parts/named the same as your component. - Add existing KiCad footprint and 3D model to parts directory, or use KiCad’s footprint editor to create a new footprint.
- Create a .ato file in this folder with the same name as your component.
Good practice
Here are a few recommended tweaks to your component class:Abstract classes
When you’re creating a class representing a specific component, for which there’s a generic abstract class (for example, anLDO), import and subclass that abstract class to get its generic methods and attributes.
For example, you should update the component class like this:
Take the mpn and manufacturer from ato create component
mpn and manufacturer are only interpreted properly if they exactly match a component in the database.